Bathroom Exhaust Fan Cover for Historic Homes
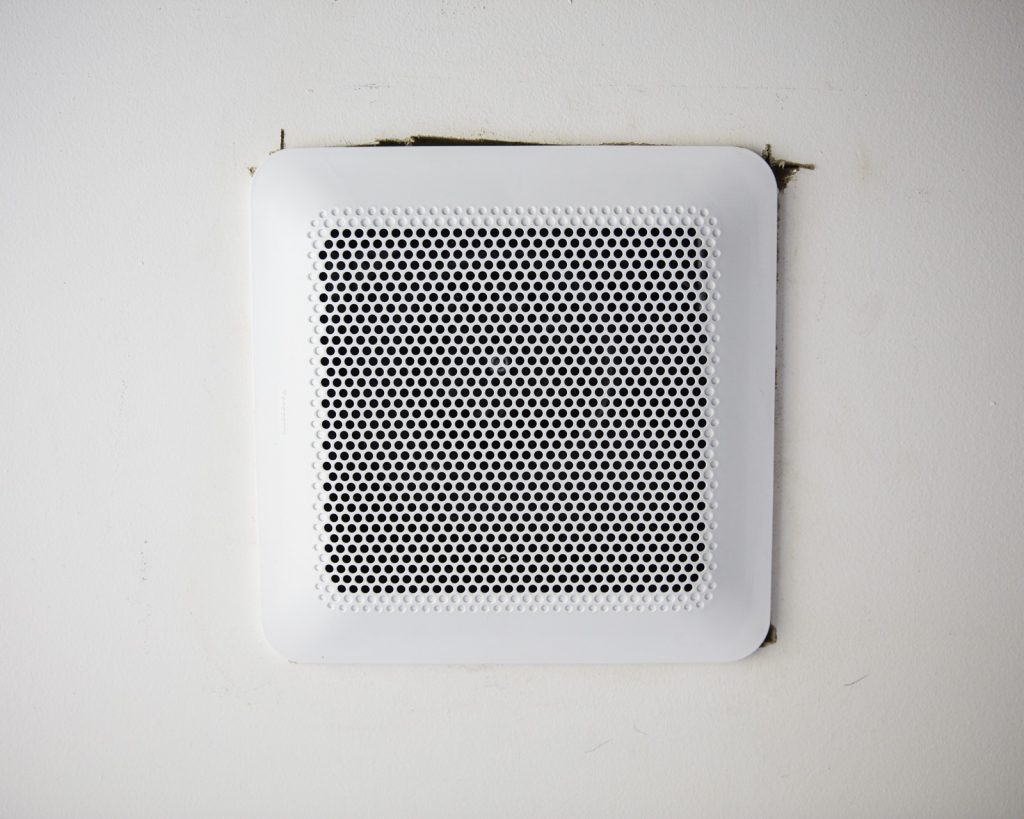
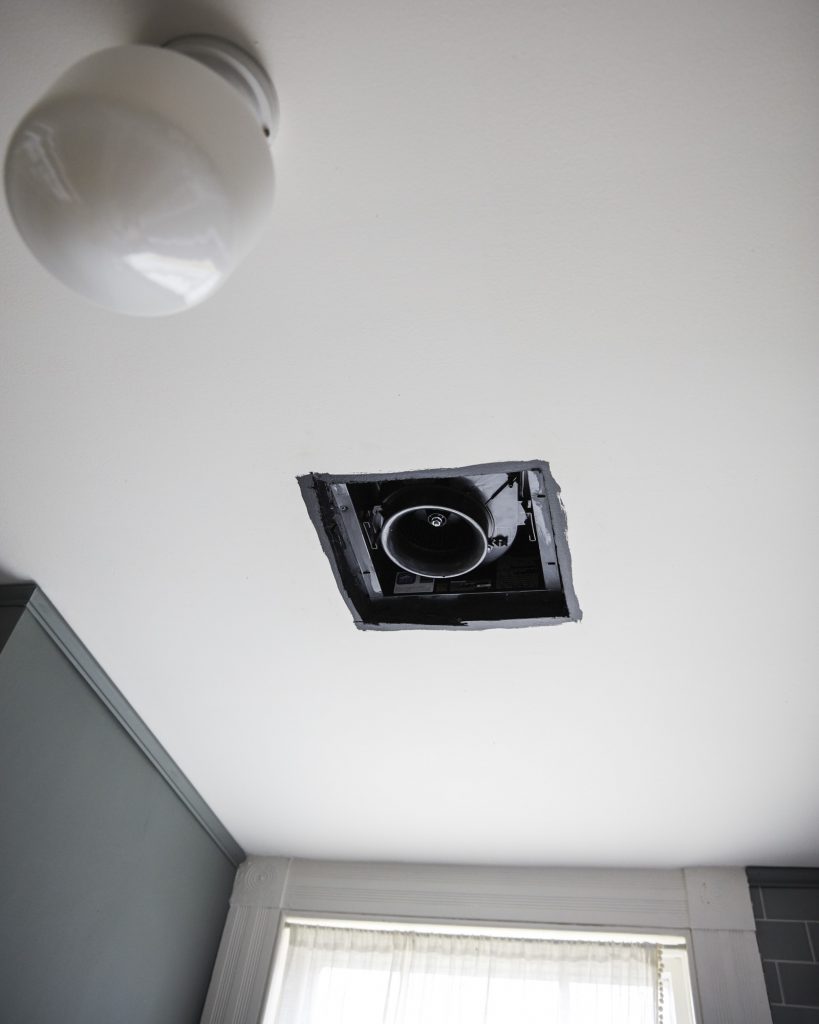
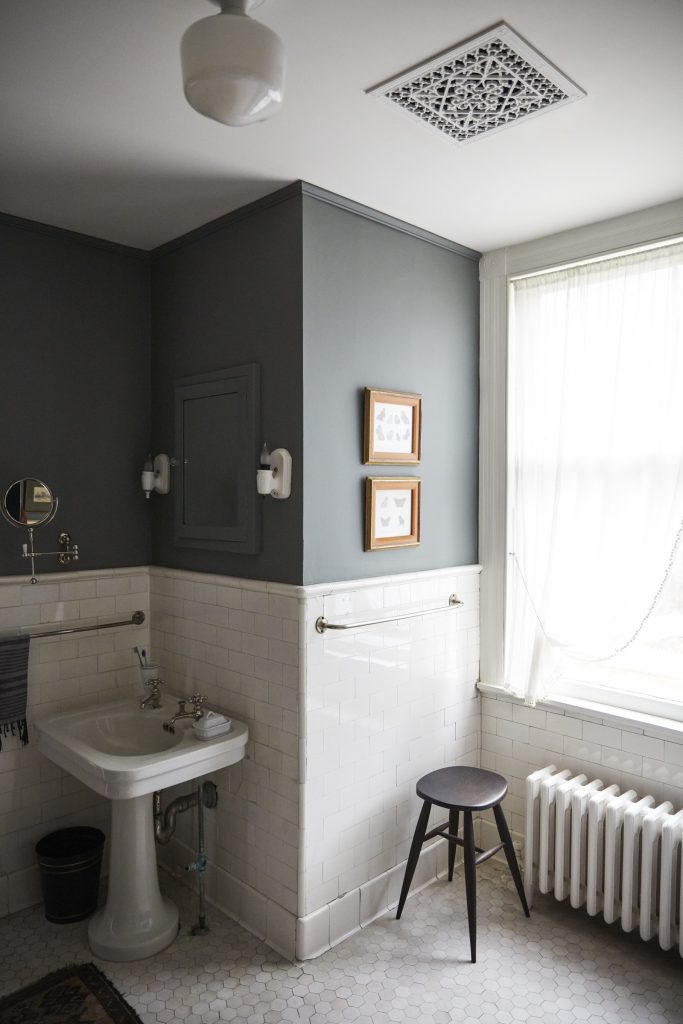
We decided to add an exhaust fan to our historic home bathroom. Our bathroom is almost finished and we added a shower to a room originally designed to only have a bathtub. Will was concerned with the moisture build up and wanted to add an exhaust fan to the ceiling. Let’s just say the fan cover that came with it had me thinking I was living in some 80s designed scientific lab, in an episode of Stranger Things. I wanted something that would look original to the house and look ‘old’ but not draw too much attention to itself.

The Exhaust Fan Cover
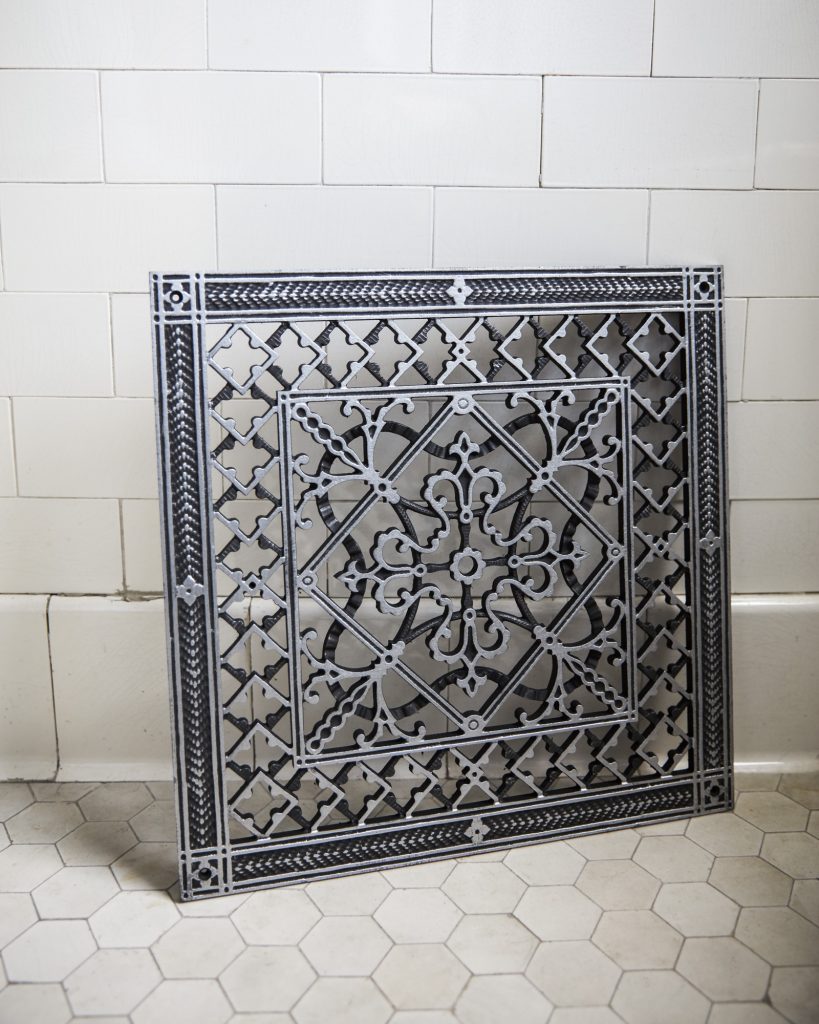
Originally, I was going to fashion a vintage cast iron vent cover, like they would have used for the first forced air heating systems. In theory, it’s perfect. Our bathrooms were built right around 1900 and old homes go through several renovation ‘periods’. I want to be historically sensitive when we add new items. Alas, my plan had a flaw: the weight of the cast iron was questionable as a ceiling mount.
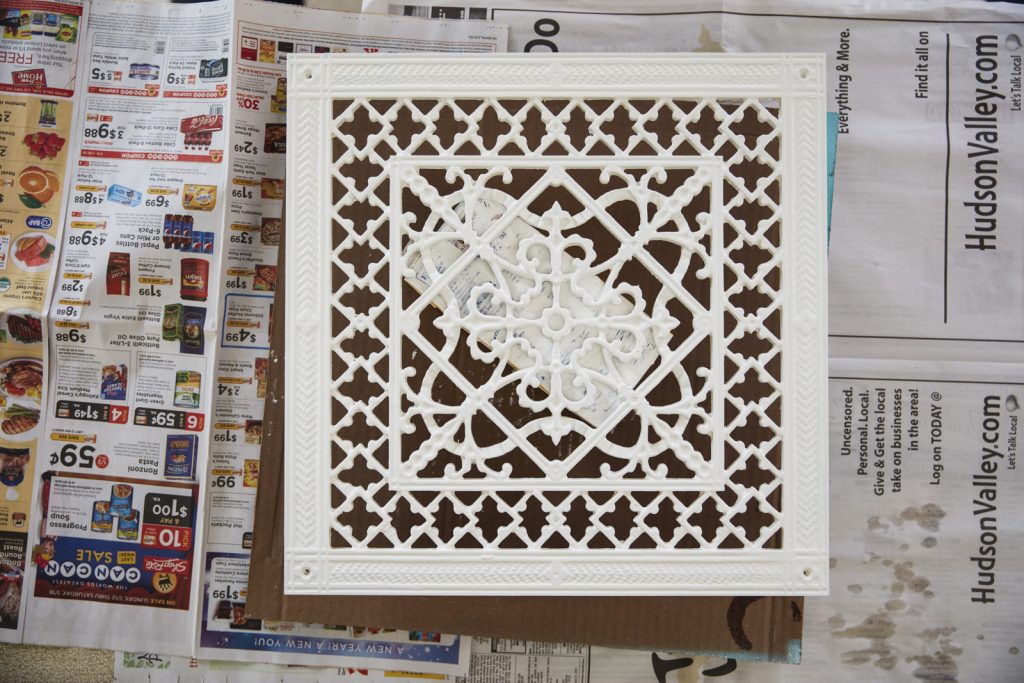
We needed around 14 x 14 inches, and the weight of the cast iron grate that size, we thought might not hold. Our ceiling is a mix of plaster, foam board insulation and dry wall. We’d have no real idea if we would hit a stud when mounting the cast iron. I wanted to play it safe since ‘if’ the cast iron fell off, it would ruin our circa 1900 tile floor. If you could guarantee you’d hit a stud, the vintage vent cover might work. Or, even safer, I found this resin grate from House of Antique Hardware. I wanted a painted looks, so the grate would look ‘old’. My big question was: will the resin take paint. It did, and quite well.
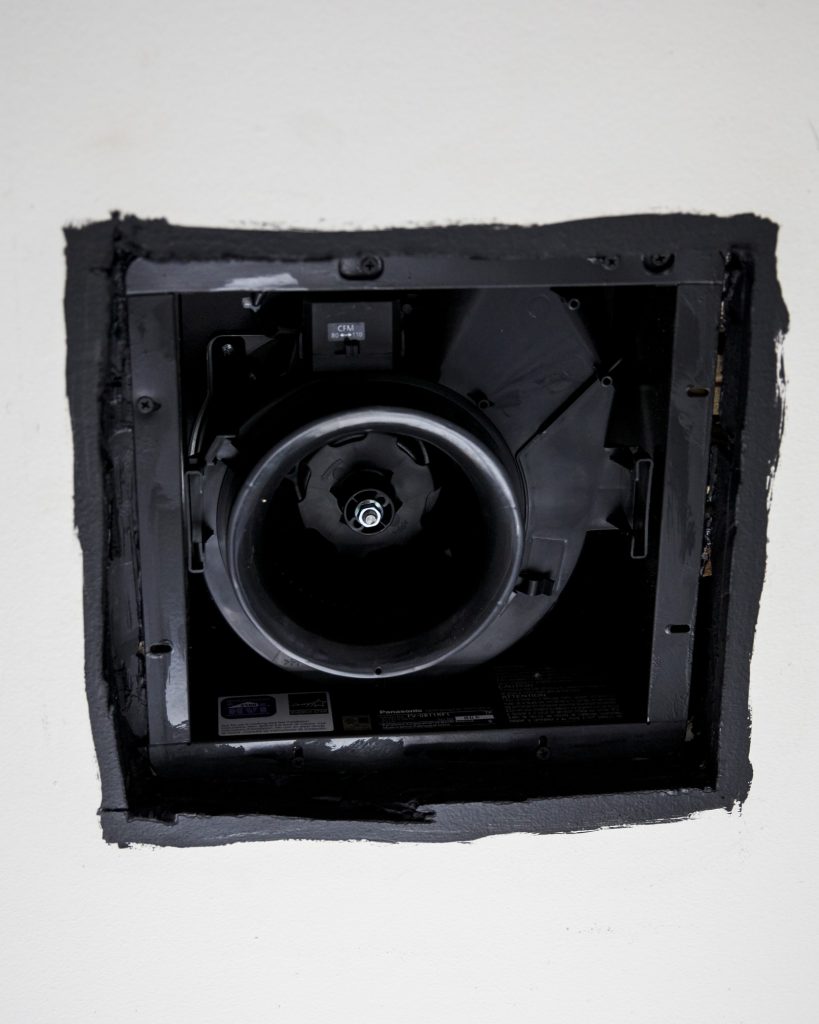
Here’s an overview of what we did to install.
Project Details + Sources
This project was very worth it! This doesn’t feel out of place or attract attention – which is what I was looking for. If you have a historic or traditional home, I’d absolutely recommend this. Here’s the details:
Cost for Grate: $224
Source/Product Link: House of Antique Hardware
One thing I like about this product is it comes in so many sizes, you could use it for different applications.
I would consider this item a splurge. Items I splurge on are difficult to find or very specialized. This item is so specific and I looked for months before finding the right aesthetic and technical spec (size, weight, material, design).
Time: About 3 days, an hour each day. Most of the time was spent waiting for paint to dry.
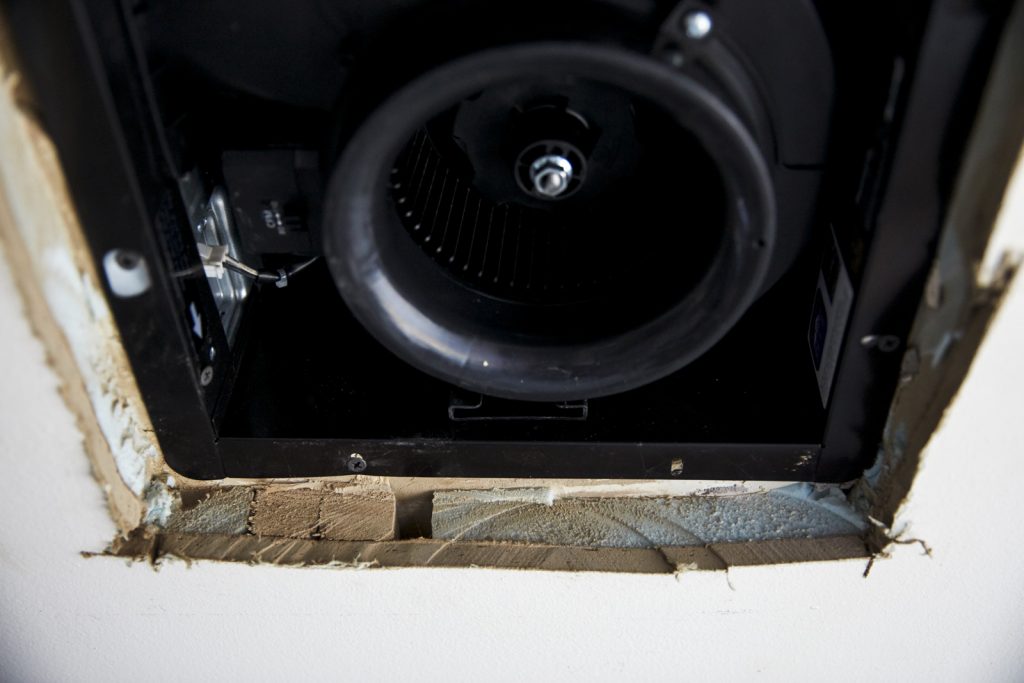
Fan Source: As part of our larger renovation, we installed this fan and find it is really quiet!
Thanks to House of Antique Hardware for gifting the resin grate product! We reached out to see if they would send the product for this content. It’s important to us to test products before posting. We reviewed weight and to see if the product was paintable. This post is not sponsored, we thought the product was great.


That’s EXCELLENT! Such a good idea.
Although the price of the grate is giving me pause, I haven’t found anything else out there for this need. I’ve also been looking for a ceiling grate – for years. We didn’t actually have a bathroom fan installed until 2 years ago but I knew the plastic cover would bother me and I’d been considering cast iron but those can be
1) expensive
2) hard to find the size you want
3) not be exactly the right style vent, have louvers on the back, or screw holes in spots that don’t align with your ceiling situation.
I’m not sure if I’m ready for this splurge yet, but at least I know the option is out there (look at all of the sizes!) And since they’re the only ones manufacturing these pieces it explains the premium price.
We’ve just done this for two of our bathrooms, one of which has a vent cover and a fan cover in close proximity on the ceiling. I’m meticulous about the details in our home and couldn’t find a ready-made pattern that suited our style. Then we discovered Pacific Register Company — they offer an affordable range of custom sizes and patterns, many of which are vintage/historic in nature. They powdercoat in a few different colors as well, so you don’t have to worry about chipping or peeling paint in a moist environment.
The color of the cover is so elegant. I’m having a hard time to think what’s the best cover that suits my bathroom and until I found this. Thank you so much for taking the time to share this with us. Looking forward to your new designs and ideas!
Interesting idea, Could I use a wooden mesh for this modification? I have a similar looking wooden plank with the carved center so it can allow air to pass.
https://casagear.com/products/square-shape-wooden-wall-panel-with-cutout-sprig-pattern-distressed-white
It’s like this but smaller.
I guess you could use Wood but I personally would not put a porous surface in such a high moisture place, especially a bathroom fan. The wood would have to be sealed very well.
Hi! No rush of course as I know there is a lot of other stuff going on, but can you please let me know what size grille you used to go with the Panasonic fan. Thank you!
I think this turned out beautifully.
When we moved into our 1904 Queen Ann, it had a combination Solotube and bathroom vent that had quit working. So when we decided to redo the 1987 remodel and return some Victorian charm, I found a vintage cast iron stove vent, stripped it, painted and glued a frosted acrylic to the back of it and hung a chandelier through the center. I have a picture on my Pinterest: https://www.pinterest.com/pin/355010383119651362/?nic_v1=1atStjEVE8EqM1IIZLTWZuOEDC6dmzi%2BEyRbC2hJPhTJ%2FMrQswfPReAgGzKOQuF0UB
I really love this upgrade. It adds such a nice touch to this older bathroom.
Merci! This is genius. No more staring at the gaping hole in the ceiling where the old (seriously ugly) exhaust fan cover used to reside and we might just get this bathroom done before year’s end (it’s only taken 10 years, so what’s a few more months!)
Notebook opened. Taking notes. Thanks for the valuable post. I wish more people would talk about this subject as in depth as you.
I felt like I’m the only crazy one who doesn’t want 1980 plastic fan cover until I found this. great example of why blogs are still so useful, searched on this very specific topic and you’ve illustrated it so nicely.
That extractor fan cover is amazing! So intricate and well made. You can tell a lot of care went into making it.